How to Upload Files to Amazon Ec2 Windows Instance
Transfer files from Windows to Amazon EC2 instance
Concluding updated on May 22,2019 21.1K Views
We have seen in our previous blog the stride by step guide to transfer the files from your Windows PC to Cloudera Demo VM. In continuation to that blog, we shall come across how to Transfer files from Windows to Amazon EC2 example.
For this likewise we crave an FTP (File Transfer Protocol) software such equally FileZilla. In that location are multiple methods to connect to AWS EC2 instance (or server), i of them is public/private primal pair method. This blog describes the pace past step procedure to transfer the files using Public/Individual Key pair.
Step1: Download FileZilla and install it
Download and Install the FileZilla for the Windows Operating System from the below link:
https://filezilla-projection.org/download.php
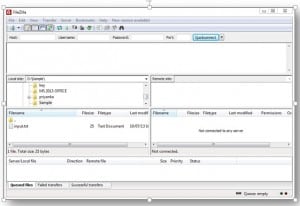
Open the FileZilla. The following screen will appear:
Step 2: Establish the connection with Cloudera
To found the connection nosotros need the post-obit four parameters:
Hostname: Public ID (hostname) of Amazon EC2 instance.
Username: The username of the AWS EC2 server. By default it is 'ubuntu'.
Password: AWS Cluster exercise not have any countersign. It only uses keys.
Port Number: The port number to access the file transfer service on the Cloudera Demo VM.
Equally information technology is a SSH connection, utilise the port number '22'.
Below are the values of the AWS EC2 instance:
Hostname: ubuntu@ec2-50-112-55-41.us-west-2.compute.amazonaws.com
Username: ubuntu
Password: 'Blank' as AWS EC2 uses Cardinal based hallmark
Port Number: 22
Edit these parameters in FileZilla fields as shown in the following image.

Now, specify the private cardinal file (.ppk) to connect to the respective respective cluster server.
Click on Edit -> Settings, you volition find the beneath screen:

Click on SFTP and select option Add together Key file as highlighted in the below image.

Select the location where your key (.ppk file) is present and click 'OK'. Click on the 'Quickconnect' button in FileZilla.
Once connected to the instance, correct Pane of your FileZilla GUI will listing the directory structure of your Amazon EC2 cluster instance equally shown in the following image:

The remaining steps are similar as we accept done in our previous blog.
Upcoming Batches For AWS Solution Architect Certification Grooming Course
| Class Name | Appointment | |
|---|---|---|
| AWS Solution Builder Certification Preparation Course | Class Starts on 11th April,2022 11th Apr Monday-FRI (Weekday Batch) | View Details |
| AWS Solution Architect Certification Training Course | Class Starts on 7th May,2022 7th May Sabbatum&SUN (Weekend Batch) | View Details |
| AWS Solution Builder Certification Training Grade | Form Starts on 9th May,2022 ninth May Monday-Friday (Weekday Batch) | View Details |
Recommended videos for you lot
Building Scalable Application on Cloud
Watch Now

Efficient Disaster Recovery with Cloud Computing
Watch Now

AWS Tutorial – A Complete Tutorial On Amazon Web Services
Watch Now

What Is Cloud Computing? – A Beginner's Guide To Agreement Cloud
Sentry Now

AWS vs Google Cloud – Cloud Platform Compared
Scout Now
Power The Hadoop Cluster With AWS Cloud
Picket Now

AWS Vs Azure – Deject Platform Comparison
Lookout Now

AWS Certifications – All You Demand To Know
Watch Now

What Is AWS – Getting Started With AWS
Spotter At present
Recommended blogs for you

Existent World IoT Applications in Different Domains
Read Article

What is Google Cloud Platform (GCP)? – Introduction to GCP Services & GCP Account
Read Commodity

AWS Salary: How Much Does An AWS Professional Make?
Read Commodity

What Is Amazon Athena? – The New Serverless Information Analytics Tool
Read Article
Elastic Load Balancer Tutorial – One Step Solution For The Uncertain
Read Commodity

Cloud Engineer : Roles Responsibilities And All You Demand To Know
Read Article

How to Launch an EC2 Instance From a Custom AMI?
Read Article

Peak 50 Salesforce Interview Questions And Answers Yous Must Prepare In 2022
Read Article

What Is Salesforce? A Beginner's Guide To Understanding Salesforce
Read Article
Transfer files from Windows to Amazon EC2 instance
Read Commodity

Spring Boot Microservices: Building Microservices Awarding Using Spring Boot
Read Article

Google Cloud vs AWS : Which Cloud Service Provider to Choose?
Read Article
Amazon VPC Tutorial- Secure Your AWS Environment
Read Article
All y'all demand to know almost Amazon'southward Network Load Balancer
Read Article
Source: https://www.edureka.co/blog/transfer-files-windows-ec2-to-amazon-instance/
Belum ada Komentar untuk "How to Upload Files to Amazon Ec2 Windows Instance"
Posting Komentar